🖼️ CDN
ㅤ
The Qbox CDN is a Cloudflare-powered content delivery network built for FiveM servers that need fast, reliable, permanent file hosting. Whether you are handling phone photos, user-generated media, or other static assets, it gives you a simple way to upload, store, and serve files worldwide without relying on fragile one-off hosting solutions.
Too many servers end up depending on temporary file hosts, self-managed storage, or services that were never designed for long-term in-game media delivery. That usually works right up until it does not. Images disappear, uploads start failing, links break, and players are left with missing content. The Qbox CDN solves that by giving you a dedicated dashboard, predictable storage limits, and infrastructure built specifically for this use case.
Who is this for?
This is for server owners, developers, and communities that need a proper CDN for FiveM media hosting.
Common use cases include:
- In-game phone scripts that let players take and upload photos
- Scripts that generate screenshots, profile images, evidence photos, or gallery content
- Server systems that need permanent image hosting instead of temporary upload providers
- Communities that want a simple dashboard to manage files without maintaining their own storage stack
What do I get?
Every plan includes CDN storage:
| Plan | CDN storage |
|---|---|
| Free | 2 GB |
| Ducklin | 20 GB |
| Duck | 60 GB |
| Qboxxer | 120 GB |
See plans for everything else each plan includes.
You also get:
- A web dashboard to upload, browse, move, download, and delete files
- Global delivery through Cloudflare for fast media loading
- API keys for integrations and scripted uploads, each with its own settings
- Folders, search, and filters to keep a large library tidy
- Retention rules that clean up old uploads for you
- Shared access for your team, with roles that decide who can see or change each page
Why use the Qbox CDN?
The goal is simple: make media hosting for your server easy, stable, and fast.
Instead of piecing together your own storage solution, you get a workflow that is already designed around common FiveM needs. Sign in, open the dashboard, create an API key if needed, and connect your supported resources. From there, you have a central place to manage files and monitor storage usage.
This is especially useful for phone scripts and similar systems where broken image hosting immediately affects the player experience. A proper CDN keeps uploads accessible, improves reliability, and removes the overhead of maintaining your own media pipeline.
How it works
Sign in to the dashboard with Google, Discord, or your email or username. The CDN has four pages in the sidebar: Overview, Media, Retention & cleanup, and API keys. Who can see or change each page is set with roles.
To connect a script, create an API key and follow one of the setup guides:
Overview
The Total storage card shows how much of your plan's storage is used, how much is left, and how many files you have. Below it, the Images, Videos, Audio, and Other files cards show how much space and how many files each type takes up. The Monthly uploads chart shows how many images, videos, and audio files were uploaded in each of the last six months.
Media
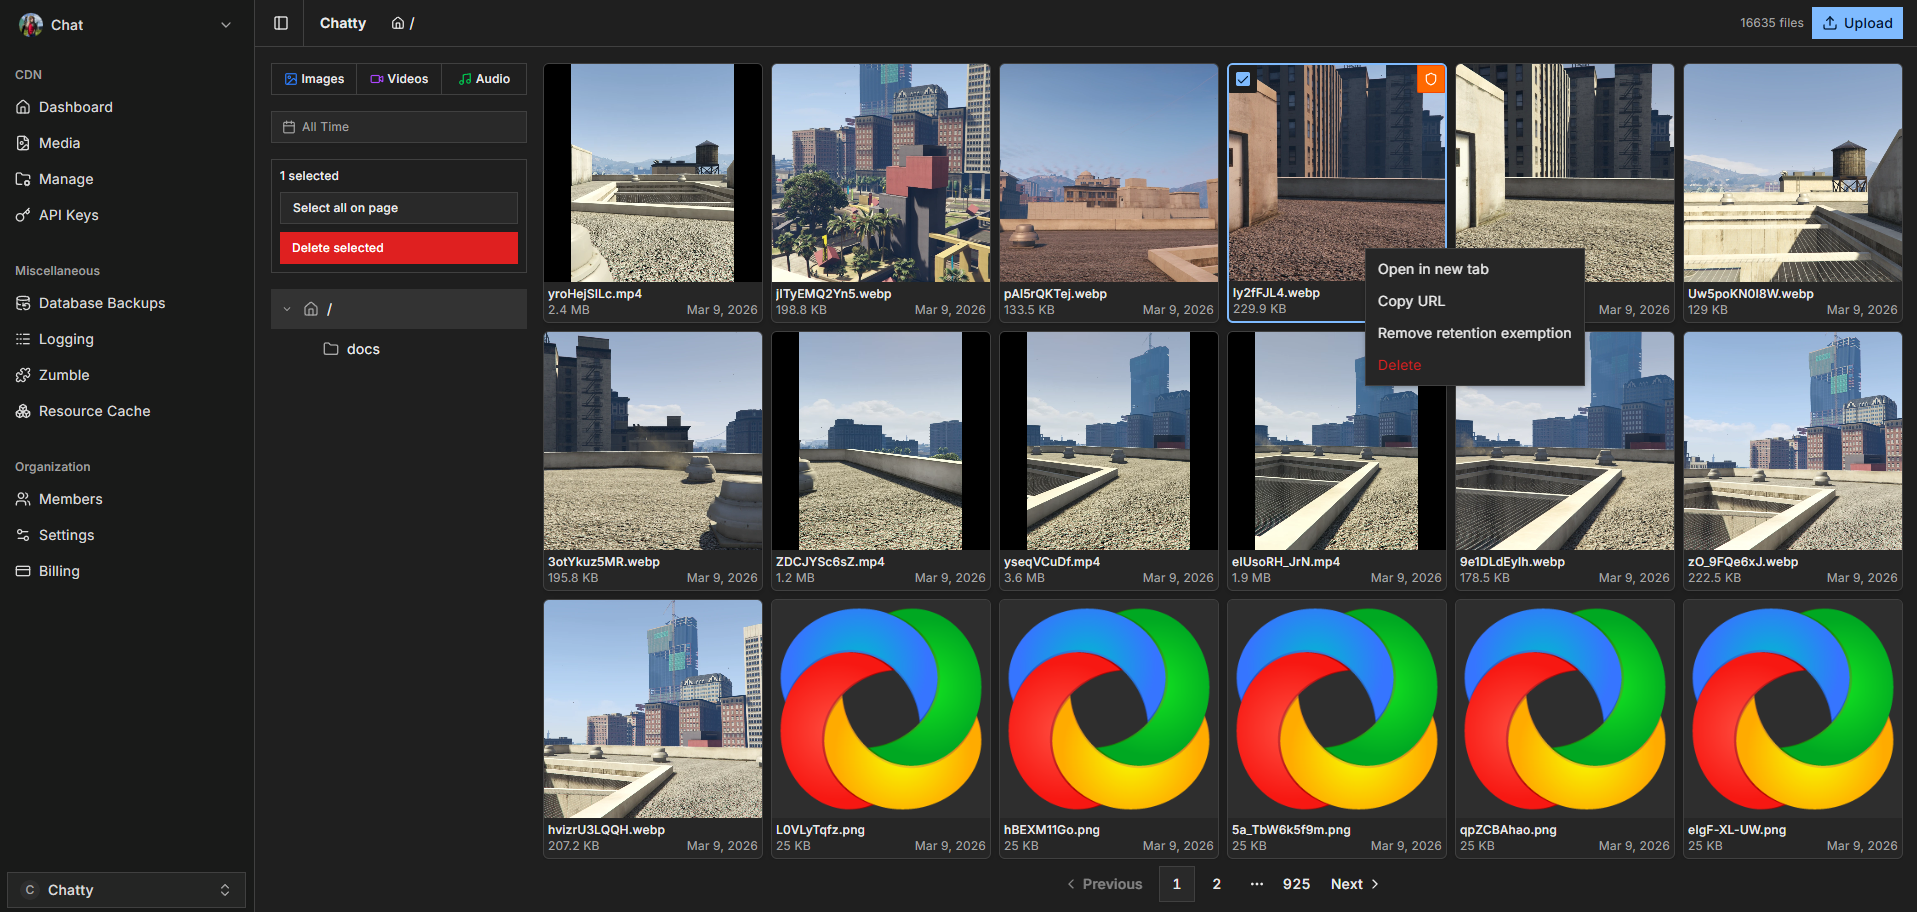
This is where you browse and manage your files: folders on the left, your files in a grid on the right.
- Type in Search at the top to find files by name.
- Use the Images, Videos, and Audio toggles to show only those types, and the date button (All time, Last 30 days, Last 90 days, or your own dates) to narrow it down by upload date.
Uploading
Press Upload to open Upload files or a folder. Drop files into the box, or press Select files or Select folder. Files land in the folder you have open. You can also drop files anywhere on the page.
Uploads from the dashboard accept images, video, and audio only, up to 100 MB per file. Tick Exempt uploads from retention policy if these files must never be removed by retention rules.
Folders
Hover a folder in the tree to see its buttons. New subfolder creates a folder inside it. Delete folder deletes the folder, all its subfolders, and every file inside them.
Delete folder cannot be undone. Everything inside the folder is gone for good.
Selecting, moving, and deleting
Tick the checkbox on a file to select it. With files selected, the left side shows Select all on page, Move to…, and Delete selected. You can also drag selected files onto a folder in the tree to move them.
Right-click a file for more options:
| Option | What it does |
|---|---|
| Open in new tab | Opens the file in your browser |
| Copy URL | Copies the file's public link |
| Move to folder… | Moves the file to another folder |
| Mark as retention exempt | Retention rules never remove this file. Exempt files show a shield in the corner. Choose Remove retention exemption to undo it. |
| Delete | Deletes the file permanently |
Downloading
Press Download to get your files as a zip. Pick Everything or the folders you want; each folder includes everything inside it. Large downloads are split into several zips of up to 10 GiB each, and the download links are valid for 1 hour.
Retention & cleanup
Retention rules
Without rules, files are kept until you delete them. A retention rule removes files once they are older than a number of days. Press New rule and fill in:
| Field | What it means |
|---|---|
| Folder | The folder the rule applies to |
| Media type | All types, Images, Videos, or Audio |
| Retention days | How old a file may get before it is removed, from 1 to 3650 days |
| Apply to subfolders as well | Also applies the rule to every folder inside it |
You can have one rule per folder and media type. Files marked as retention exempt are never removed by rules, and deleting a rule does not delete any files.
Bulk delete
Bulk delete removes many files at once. Choose a Folder, whether to Include subfolders, the Media types, and optionally a Date range, then press Delete matching media. The dashboard shows a summary and asks you to confirm.
Bulk delete is permanent. Picking the root folder with Include subfolders matches every file in your organization.
API keys
Your scripts upload through API keys. You can create as many as you need, each with its own settings, for example one for your phone script and one for ShareX.
Press Create API key and fill in:
| Setting | What it does |
|---|---|
| Name | A name for the key, up to 32 characters |
| Restricted media types | Tick Images, Videos, or Audio to allow only those. A key with restricted media types refuses every other type. Leave all unticked to allow them all. |
| Upload folder | The folder uploads with this key go into |
| Exempt all uploads from retention | Retention rules never remove files uploaded with this key |
| Allow this API key to delete files | Lets the key delete files, not only upload them |
| Enable rate limit | Allows at most Max requests per Window (minutes) |
| Expires in (days) | Up to 365 days. Leave it empty for a key that never expires. |
After you create a key, the dashboard says: "Copy this key now. It is only displayed once here; afterwards use Reveal on the key row." Treat the key like a password.
The menu at the end of each key row has Edit, Reveal key, Regenerate, Enable or Disable, and Delete. Regenerate gives the key a new value and the old one stops working immediately, so update your scripts right after. Disable switches a key off without deleting it.